Orthoses for Trigger Finger
A study on the effectiveness of different orthotic designs
Do you have a favorite orthosis for trigger finger? As you might know, they generally come in many shapes and sizes. But there is no real consensus over the best design and/or wearing schedule. An interesting study (2018) by Teo, S.H. et al., may offer some guidance as it compares the effectiveness of two different orthoses for trigger finger:
- Proximal interphalangeal (PIP) joint blocking orthosis
- Metacarpophalangeal (MCP) joint blocking orthosis
Keep reading to learn about the most effective orthosis in the study and learn how to fabricate both orthotic designs!
Causes and symptoms of trigger finger
In essence, trigger finger, or Stenosing Tenosynovitis, is a common hand condition that causes a painful clicking or locking of a finger or the thumb. The causes involve pathological thickening of the flexor sheath, the annular pulley system, and/or changes within the flexor tendons. Sometimes these thickenings can be felt as a palpable nodule, and often prevent the tendon from gliding inside the tendon sheath.
Patients often complain initially of asymptomatic clicking of the finger which may then progress to painful triggering and locking. Triggering most commonly occurs at the A1 pulley whereas the triggering symptoms occur at the proximal interphalangeal joint (PIPJ). Either the flexor digitorum superficialis (FDS), flexor digitorum profundus (FDP), or both flexor tendons might be involved.
Study on orthoses for trigger finger
Conservative management of trigger finger typically involves wearing an orthosis to limit motion. As mentioned before, however, it is not clear which design is the most effective. A study published in the Journal of Hand Therapy has compared the use of two different trigger finger orthoses.
Method
The Singapore researchers randomized 35 patients with trigger finger (Green’s classification grade of 2 and 3) into two groups that each received a different orthosis:
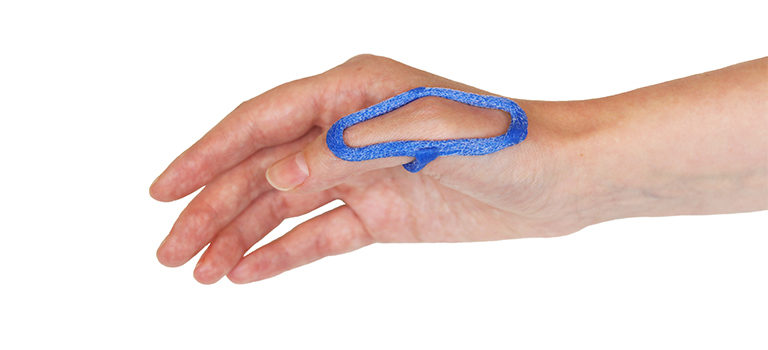
- PIP joint blocking orthosis (commercially available Oval-8 orthosis)
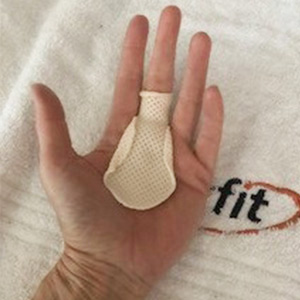
- MCP joint blocking orthosis (custom made ring orthosis over proximal phalanx described by Lindner-Tons and Ingell)
The patients were instructed to wear the orthoses during all of their daily activities and to also keep track of the hours of use. Some were also advised to wear the orthoses during the night if needed.
The researchers consequently collected outcome measures including pain numerical rating scale, Green’s classification grading, Quick Disability of the Arm, Shoulder and Hand (DASH) scores, and duration of orthotic wear.
After that, the patients were followed up for 2 months, and changes between the initial and the final assessment scores within each group and between both groups were analyzed.
Findings: MCP vs. PIP joint orthosis
The results of this study indicate that both orthoses helped patients with a reduction of pain, but the group wearing the PIP joint orthosis had better pain relief.
Both groups improved on the Green’s classification scale by at least one grade. The PIP joint orthosis group demonstrated significant improvement in the Quick DASH scores and wore the orthosis for significantly more time than the other group.
In other words, the study’s findings indicate that while both orthoses are helpful at pain reduction, the PIP joint orthosis has certain advantages over the custom-made MCP joint orthosis:
- Better functional performance
- Less restrictive
- More cosmetically appealing
The research suggests wearing the orthosis for 24 hours per day for more than 8 weeks to get the best outcome.
Orthotic fabrication tutorial: MCP & PIP joint orthoses
Now that we know more about possible orthoses for trigger finger and their effectiveness, we can focus on the actual orthotic fabrication process. We will show you how to create both orthoses that were featured in the study and share a few bonus options.
As for the materials, you can use our lightweight (1/12” – 2,5 mm or 1/16” – 1,6 mm) Orfilight in Beige, Atomic Blue, or Black to create highly conforming ring orthoses for the MCP joint design. Additionally, you can use Orficast in Blue or Black for a quick and easy fabrication process and for the PIP orthosis.
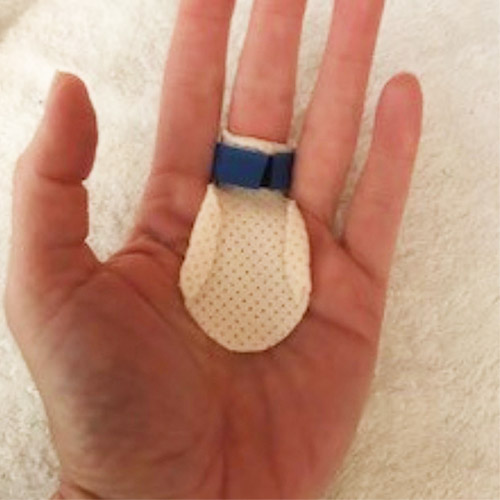
MCP joint blocking orthosis
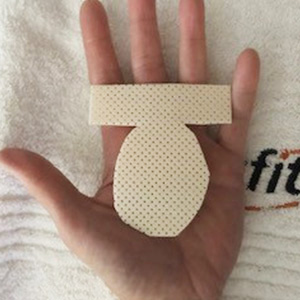
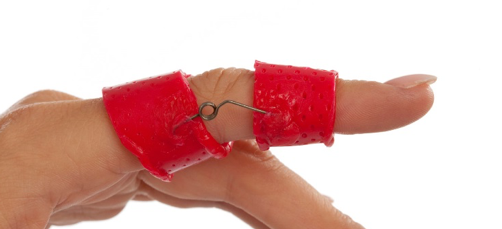
Using Orfilight Beige, Atomic Blue NS or Black NS in 2,5 mm (1/12”) or 1,6 mm (1/16”), cut out a T–shaped piece as shown above.
- Firstly, activate the material and wrap the wings around the proximal phalanx.
- Then, pinch on the dorsal side and cut while warm to create a seam. This will allow the orthosis to easily slide on and off.
- Alternatively, you can also open the seam when the material has cooled and apply a Velcro strap to hold it in place.
- The material in the volar palm should block full MCP joint flexion of the involved digit.
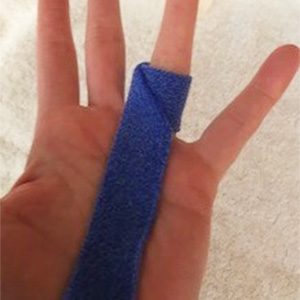
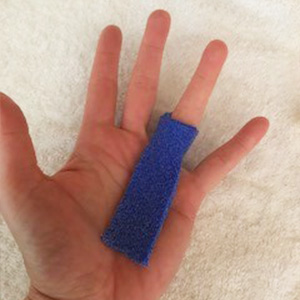
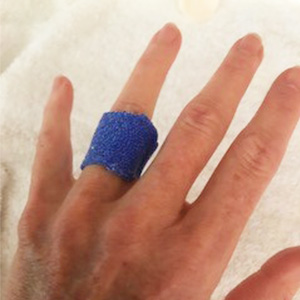
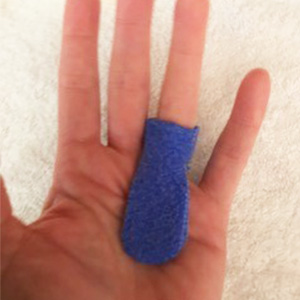
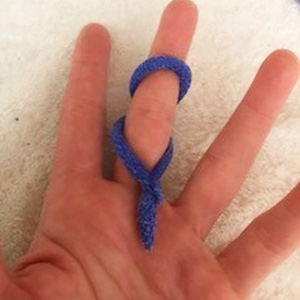
Activate a piece of Orficast 3 cm (1”) about 24 cm (8”) long,
- With one end, wrap the material around the proximal phalanx and seal.
- Fold on an angle as shown in the first image.
- Secondly, stretch the material into the palm.
- Then fold on itself back up to the level of the volar PIP joint.
- Fold once more, stretching the end back into the palm.
This creates a volar piece of three layers, while the ring around the proximal phalanx consists of one layer.
- At this point, ensure that all seams are bonded together well.
- Trim the corners and allow for full PIP flexion, while preventing full MCP joint flexion.
Check out our blog poston the MCP joint blocking orthosis for further information on this design.
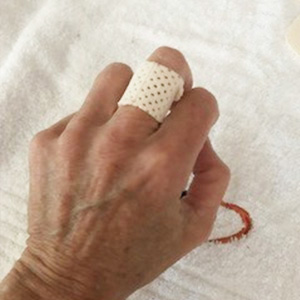
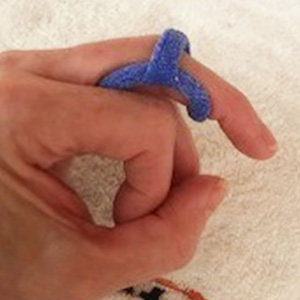
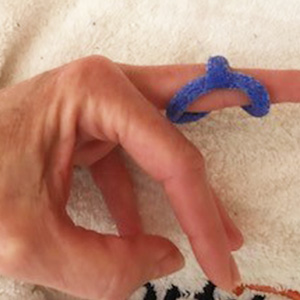
PIP joint blocking orthosis (figure-of-8 design)
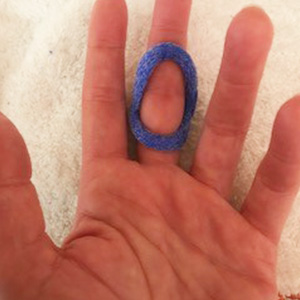
Using Orficast 3 cm (1”) width, cut a piece about 18 cm (6”) long.
- Firstly, activate and roll together tightly lengthwise, creating a narrow strip of material.
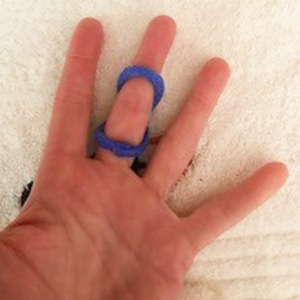
- Then, form an oval shape over the volar finger, including the proximal and middle phalanges.
- Overlap the material on one side of the PIP joint.
- Continue placing the strip across the dorsal PIP joint and bond at the opposite side of the PIP joint.
- Finally, trim the excess.
- This orthosis can be slid off and on.
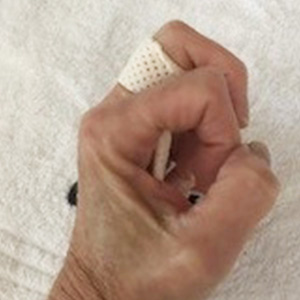
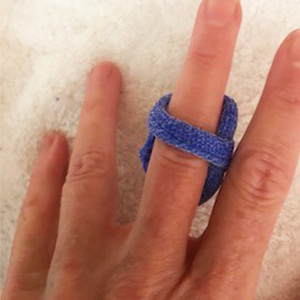
Using Orficast 3 cm (1”) width, cut a piece about 18 cm (6”) long.
- Firstly, activate the material and roll together tightly lengthwise, creating a narrow strip of material.
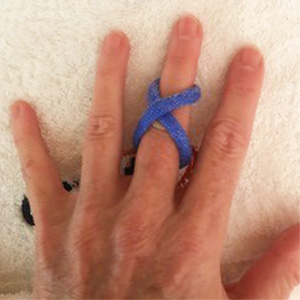
- Then, create a figure-of-8 wrap around the involved digit, forming a Criss-Cross or “X” pattern over the dorsal PIP joint.
- Finally, bond the edges together on the volar surface and trim the excess.
- This orthosis can also be slid off and on.
Instructional videos
To conclude, we share two instructional videos you can follow along with to create your trigger finger orthoses.
In this first video, we show you how to create a PIP joint blocking orthosis. Simply turn the orthosis around on the finger to block PIP flexion as in the orthosis we showed earlier.
This second video features a ring design orthosis that you can also use to treat trigger finger.
Reference (Article in Press)
Teo, S. H., Ng, D. C. L., & Wong, Y. K. Y. (2018). The effectiveness of proximal interphalangeal joint–blocking orthosis vs metacarpophalangeal joint–blocking orthosis in trigger digit management: A randomized clinical trial. Journal of Hand Therapy.
![]()

Written by Debby Schwartz, OTD, OTR/L, CHT
Physical Rehabilitation Product and Educational Specialist at Orfit Industries America.
Debby is a certified hand therapist with over 36 years of clinical experience. She completed her Doctorate of Occupational Therapy at Rocky Mountain University of Health Professions in 2010. She has worked at Orfit Industries America as Product and Educational Specialist since 2007.
Debby is also an adjunct professor at the Occupational Therapy Department of Touro University, School of Health Sciences, and at the Occupational Therapy Department at Yeshiva University, Katz School of Science and Health in NYC. She has written many book chapters in the field of hand therapy and multiple articles for hand therapy journals, including the ASHT Times and the Journal of Hand Therapy. She has published a new textbook on orthotic fabrication together with Dr. Katherine Schofield, entitled “Orthotic Design and Fabrication for the Upper Extremity: A Practical Guide”.
![]()

